While trying to keep up with what all the hip young people are doing and liking (let's face it, we're not the target audience anymore), I've noticed a trend in the look of today's pretty young things. A trend that is pleasing to my aesthetics, and inspires me to tweak my own beauty routine. I call it glam-femme. Necessary components:
- flawlessly contoured
- preferably tan skin
- perfectly shaped brows
- long lashes
- classically elegant eye make up (think cat eyeliner or a soft smokey eye)
- lips lined just outside the natural lip line, finished with a luscious taupe-mauve-beige-nude (depending on your colouring) matte lipstick (I got my eye on Mac Velvet Teddy)
I love this trend especially because it's a look that keeps coming back into style. Remember Brigitte Bardot, Audrey Hepburn, Cindy Crawford: every decade has beauty icons rocking the glam-femme look.

Brigitte Bardot, Audrey Hepburn, Cindy Crawford - pictures via google
Perfect contemporary examples of this trend are singer/actress Ariana Grande and reality star Kylie Jenner (youngest of the Kardashian clan).

Ariana Grande and Kylie Jenner - pictures via google
Now, tell me you can look at these girls and not be like "DAMN I wish I had a live-in make up artist". In the case of Kylie Jenner, her perfect lips are undoubtedly surgically enhanced (make up can do a lot, but not TRIPLE the fullness of your upper lip), but that doesn't mean we can't take a page from her book.
I created my own version of the glam-femme look on a whim and decided to put together a step by step tutorial. This make up look is perfect for any sort of dressed up occasion so I bet you'll find some use for it.
What I used:
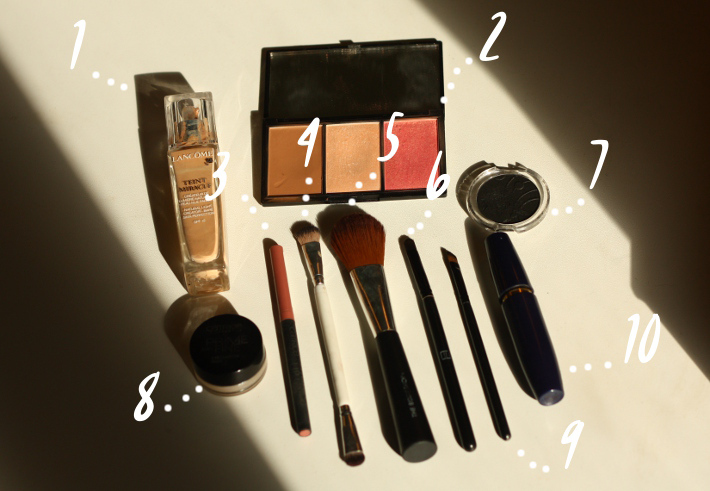
1: Lancôme Teint Miracle foundation
2: Sleek Face Form contouring kit
3: Catrice lipliner Lost in the Rosewood
4: Hema full eyeshadow brush
5: The Body Shop contouring/blush brush
6: Hema flat eyeshadow brush (used for eyebrows)
7: Essence black matte eyeshadow
8: Catrice Prime and Fine eyeshadow primer
9: angled eyeliner brush
10: Maybelline Volum Express mascara
11: (not pictured) Hema Eyebrow pencil in dark brown
12: (not pictured, I did a crappy job) Hema liquid eyeliner
12: (not pictured, I did a crappy job) Hema liquid eyeliner
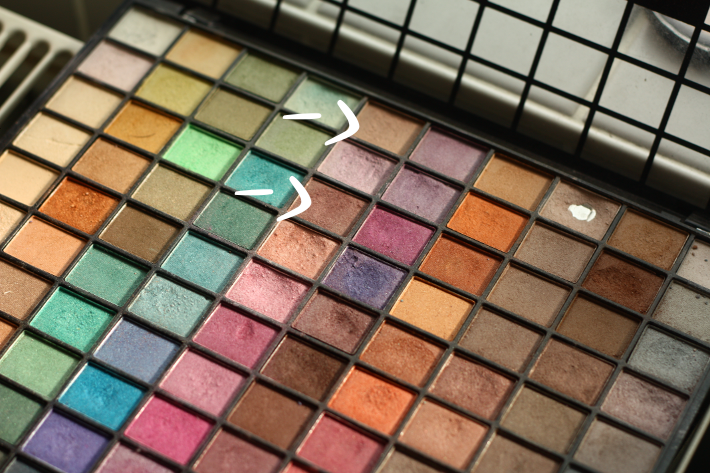
And these two mauve-ish shades from my E.L.F. 100 colours eyeshadow kit.
First step: foundation! I love the Lancôme Teint Miracle foundation because it provides amazing coverage, and natural skin-like finish.

Huge difference, right? This particular shade is a tad too warm for my own complexion, but a friend gave it to me and as long as I blend it down my jawline, the colour does work.
Second stap: add eyebrows. I do this in two stages. First, I use a pencil to draw clear lines along the edges of my eyebrows. This step is necessary for a clean shape. Secondly, I use my flat eyeshadow brush to blend the pigment towards the middle of my eyebrows.

Next step: on the left, you see my face with just foundation and brows, on the right I added contouring, blush and highlighter. For an in depth tutorial on contouring, check out this post.

Now, time for the eyes. I used the lightest shade (a purple leaning beige) on my entire moving eyelid, and the darker mauve in the crease. Then I used my angled brush to draw on a black line following my lashes. I've noticed that using eyeshadow or pencil underneath my eyeliner helps me get a neater result. Finally, I drew on a cat eye with eyeliner and used mascara.


Are you still with me? We're almost there! Last step: perfect lips. Using nude lip liner to draw JUST outside the natural edges of your lips gives roughly the same effect as very subtle collagen injections but not as permanent, much cheaper and totally painless. WIN WIN.

Just compare picture number 1 and picture number three to see what a huge difference a little liner makes.
And voila!

Va-va-voom! Obviously I took some more pictures, because: good face day.
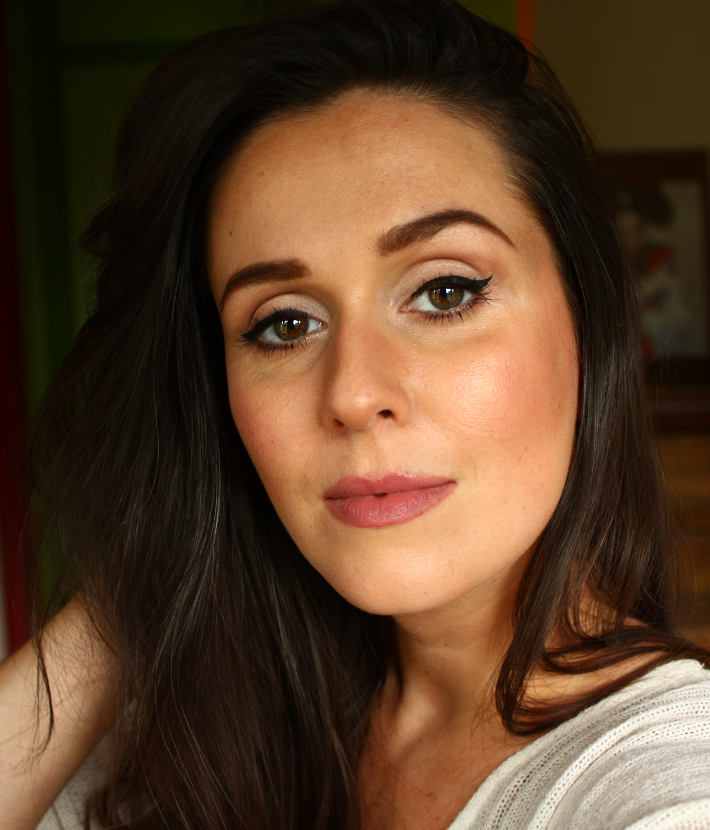

Not too bad, right? This has been my go-to look over the past week, but I usually skip the eyeliner and swap it for smudged pencil since it takes a lot of time to get just right.
Hope you like it, and let me know if you have any questions!


Looking hot! Ik vind de total look as worn by Kylie en Ariana wel een beetje te cake face, maar kan wel voor een avondje uit. Full lips ftw!
ReplyDeleteJa het zijn echt "performance" looks. Allez, bij Kylie is het ook veel filter denk ik. Mijn eigen versie hier heb ik gewoon op een "normale" dag gedragen en ik moet zeggen, dit was de eerste keer dat ik dacht "misschien bestaat er toch zoiets als too much voor mij" :-D Ik voelde me een klein beetje Miss België op weg naar een acte de présence. But I powered through.
ReplyDeleteter illustratie, dit is dezelfde look zonder eyeliner: nog steeds echt wel "made up" maar wel geschikt voor overdag op't werk.
ReplyDeletehey mevrouw!!
ReplyDeleteI love it! You are gorgeous. I like looks like this because they're so classic, and relatively simple. Perfect for daily use!
ReplyDeleteI've just moved out of the target market and I'm feeling so old! I guess it's time to embrace my age and borrow from the youth whenever it suits me. - Leah, stylewiseguide.com
ReplyDeleteHey, we're still awesome. And that's absolutely the right life motto!
ReplyDeletesupermooi! Deze make-up staat je geweldig!
ReplyDeleteIt's definitely a super pretty look! I really like the nude but not too nude lips. You look wonderful!
ReplyDeleteBOMBSHELL op mijn scherm! Mijn oogvorm laat zo'n glamorous winged eyeliner helaas niet toe, maar ik vind het wel heel mooi om naar te kijken ;-) Tof ook hoe je zo'n chique look creëert met (voornamelijk) budgetmerken, Annebeth! Toont aan dat je niet al te veel geld moet uitgeven om er toch als 'je beste zelf' uit te zien. (Btw: zit er Kardashian-gen in uw bloed? :D)
ReplyDeleteSupermooi! Ik heb zelf nogal moeite to pull this off want lichte huid & rood haar gaan niet zo goed samen met zware eyeliner (hallo panda/goth) jij hebt idd diepliggende ogen en dan staat eyeliner je echt fantastisch. De oogschaduw trick ga ik wel onthouden, mss gecombineerd met wat zacht oogpotlood. En don't judge me maar ik weet echt niet hoe je aan highlighten/contouren moet beginnen als je van nature al super blozende wangen hebt zoals mij :D ja foundation of BB cream verbert dat een beetje maar ik wil echt niet plots met knalroze wangen rondlopen! ik heb nog nooit blusher gebruikt in mijn leven eigenlijk. Een anti-blusher zouden ze voor mij eens mogen uitvinden!
ReplyDeleteAls je houdt van een super naturelle look moet je er gewoon niet aan beginnen, contouring + blusher + highlighter is meer iets voor je als je echt een "done" look wilt. Ik heb zelf ook super rode wangen en als je eerst foundation gebruikt en dan blusher krijg je een veel mooier resultaat: meer egaal, en vaak ook nog met een zachte shimmer (blusher + highlighter in één, als het ware) waardoor je jukbeenderen beter uitkomen.
ReplyDeletetl;dr ik zou gewoon beginnen met een goeie foundation op de plekken die het nodig hebben en van daar uit verder werken.
voor je oogmake up denk ik dat iets zoals dit bij jouw oogvorm en kleuring supermooi zou staan: http://www.pinterest.com/pin/93027548527185421/
ook mooi: http://www.pinterest.com/pin/59883870019813579/
http://www.pinterest.com/pin/554224297866617178/
Ik denk dat de sleutel om panda-oog te vermijden gewoon is om de donkere kleur NIET door te trekken onder je oog, en goed te blenden met de donkerdere kleur enkel in je buitenste ooghoeken en een lichtere kleur over de rest van je ooglid. Dat maakt de look ook veel minder zwaar. Dit idee: http://www.pinterest.com/pin/565483296935607528/
HOPE THAT HELPS :D
best compliment everrrrr :D Ik denk dat jouw oogvorm meer geschikt is voor een intense smokey eye, dat werkt bij mij minder goed omdat ik zoveel ooglid on show heb :-D
ReplyDeletehttp://www.pinterest.com/pin/285204588875220289/
zoiets vind ik mooi bij jouw oogvorm!
Yes! A lot of nude lipsticks make your lips a lot lighter than their natural shade (not really nude at all) but a darker rosewood colour is totally a MLBB (my lips but better) lipstick, aka the basic everyone should have in their make up bag. It also makes your teeth look much whiter :D
ReplyDeleteTHANKS!! supermooie looks, I better step up my make-up game!
ReplyDeleteHet is superleuk om mee te experimenteren vind ik zelf :D goeie borstels en de juiste producten voor de look die je wil is wel heel belangrijk, dat deel is wel een beetje trial and error. If you have any questions: let me know!
ReplyDeleteAmazing job :) Ik wou dat ik mijn wenkbrauwen ook zo mooi kon opmaken...
ReplyDeleteemphasis your Beauty-Hair fashion in different shape I suggest to choose :- The article focusses Best Clip In Hair Extensions on the various aspect and details regarding the different hair extensions which are available with gurnard by that possibility coming up the Remy Clip In Hair Extensions formalities, we will make that way out so that the Wholesale Hair Extensions individual can fit it according to the dressing sense, ideal for Flip In Hair Extensions every design and style in the present trend.
ReplyDelete